Showing posts with label Dropbox. Show all posts

Monday, September 10, 2012

Digital flashcards on-the-go! Now there's no excuse to skip studying!

An old-school
learning tool
Growing up, I remember using flashcards to help me memorize things for school: equations, state capitols, definitions, any. Using notecards is a little bit outdated now, but with a cool app I've been playing around with recently, it's again available, but now on the iPad!

Click to download.
On the app store, it seems to go by the name Flashcards*, but on downloading, you'll see Flashcardlet; either way, you'll want to get the app to the right. On installing it, there will only be one or two flashcard stacks set up. I'd try flicking through to see how it works. Simply, though,
  • One tap will show the other side.
  • Sliding the card across will proceed to the next slide.
  • Double tapping will return to the last slide.
The app works in both landscape and portait modes, and, as an added feature, this is a app, meaning that it will work for both iPad, iPod Touch, and iPhone, so there's more bang for the buck.

So, then, the logical next question is how to make your own cards. It 
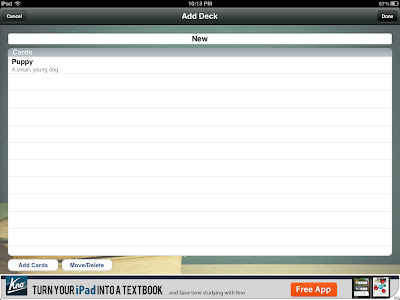
is possible to make them on the iPad, although it is an admittedly clumsy process. Here's how, though:
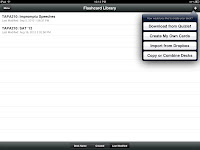
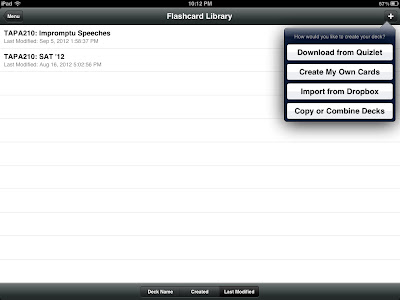
  1. On the top right, click Create My Own Cards to make your own set. (This will be after clicking on Flashcards on the main screen, by the way.)

  2. Title your deck in some way you'll remember it.


    Then click Add Cards.
  3. Fill out card fully. Click Done when you're done. (Duh.)

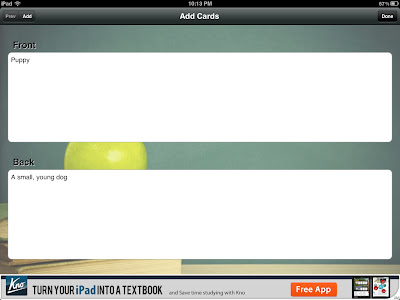
  4. Repeat the Add Cards step over and over until you have everything the way you want it. On completion, you may hit Done again.

That's basically it. Now, from here you can Share the stack with others via email or by Dropbox, which is very convenient for study buddies or classes.

It's a simple process, but time-consuming. A superior option would be using Quizlet, a free website that makes flashcards online. Flashcard* will actually all you to import any flashcards you make on Quizlet, and it's MUCH faster to do online with a real computer.

To make this happen, you simply go to Quizlet.com, create an account, and then click Create Set. As you can see, Quizlet allows you to easily make your own cards with whatever text (or images, apparently) you want. It will even auto-define words for you, in whatever language you please!

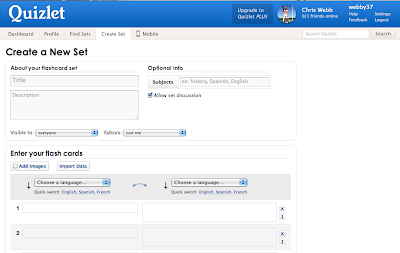
A new set, ready to be personalized.
My favorite feature, though, is under Import Data; you can simply paste in a list of vocabulary words, separated from their definition by a tab, a semicolon, or whatever symbol you already use. I have a list of SAT words my English II students memorize that I copy-and-pasted into this section; within 15 seconds, I had 170 vocabulary notecards, ready to go. I put a title on it my students (and myself) can easily find, and now, every student has 170 flashcards so they can review for their next test, any time or any place!
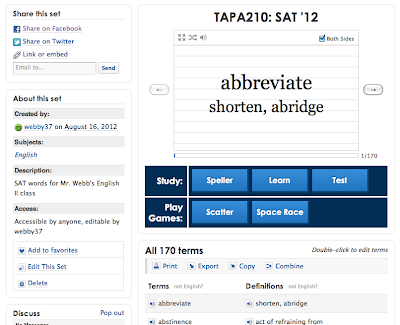
Click here for my SAT words!
It's such a simple process, and one you can easily pass on to your students. Give these two cool tools a try, and let me know how they go!


Friday, August 10, 2012

Dropbox—Because flash drives are soooo 2007.

Originally posted 8/13/11.

When I first got to TAPA, I was pretty surprised to find out that I wouldn't be able to print of my Macbook. Apparently, with the way the system was set up, only Windows computers plugged in with PaperCut are configured to print, so if I made a worksheet at home on my laptop and I wanted to print it off for class, I pretty much had 2 options:
  1. Save the file to the flash drive, unmount the drive, unplug it from my Mac and plug it into my office PC, open up the flash drive, open up the file, and print it out.
  2. Email the file to myself from my Mac and open it with my email on my office PC.
This, in a word, was annoying. I wanted to have some type of way of taking a document and working on it on one computer, and then standing up and walking to another computer and finishing that document.

Enter Dropbox.

What I did was install Dropbox to my Mac laptop, my old Windows computer at home, and my office PC at TAPA. When I come home at night and start creating a worksheet on my Mac computer, I save it to my Dropbox folder. As soon as I hit save, it will create the same exact file that I made on my Mac as I did on my home Windows computer and my TAPA office computer. Any change I make to that Mac file will immediately be mirrored on each other computer, almost instantly. 

It gets better. I come to school the next day and turn on my office computer. The file that I made last night on my Mac is already sitting there in the exact place I put it on my Mac, but now, it's on my office computer. And it looks exactly the same as I made it the night before. But wait... I made a mistake. I fix the file on the office computer, and as soon as I hit save, it will immediately update the file on my home Windows computer and my personal Macbook.

Wait, what if I'm not near my own desk but I do have internet access? I can actually still go to Dropbox.com (perhaps on my wife's office computer), log in, and access each of those files I've worked on and updated via the website. At any time. From any computer.

Pretty cool, right? But it'd be better if there was some way of adding that to the iPads, right? Gotcha. In the QuickOffice Pro HD app that all the TAPA staff and students have, there is an option to link your Dropbox account to that program. Now, if I create or edit a document on Dropbox on my iPad, it will immediately reflect those changes on my Mac laptop, my old Windows computer at home, Dropbox.com, and my office PC at TAPA

I could go on and on about this and tell you about how I've also tied in my iPod touch and my Android cell phone iPhone to this process, or about how I have shared folder with Lisa where, when she edits a document on her own Dropbox account, I get those changes instantly, too, but I'll stop there. The point is this: if you're working off of more than 1 computing device, this is a pretty required program that will make your life infinitely easier. Go check it out, please!

Thursday, September 1, 2011

Clouding your iPad a little bit more: Add Dropbox capabilities to Quickoffice

Full disclosure: I'm not the biggest fan of Quickoffice in the world. I think that it's absolutely fine for on-the-go changes and adjustments to documents, but really, as far as full, Step 1 to Step 5 or 6 or 10, it's not epic. Typing on a non-tactile keyboard is quite a challenge for me, and the formatting that I rely so heavily on in Powerpoint, Word, and Excel isn't easily available on this app. However, it's a heck of a lot cheaper to download one US$14.99 app that gives you access to all 3 programs than Mac's US$10/each Keynote, Pages, and Numbers, and, for what it's worth, Quickoffice proves to be a speedy little app that will allow you to make adjustments to documents instantly (provided those documents don't involve formatting).

However, I accidently stumbled onto a feature a few days ago that began to sway my feelings on this app: Dropbox integration! What? Here's how:

  1. On the main screen of the app, click on the little + to the bottom left. Up will pop a list of accounts you can add to your Quickoffice.


    Obviously, click on Dropbox for this lesson. (However, if you're using Mrs. Webb's favorite little tool, SugarSync, or MobileMe, or you want to connect to your TAPA Google Docs account, basically follow the same following instructions.
  2. Fill in your account information. If it's Dropbox, it's your email address you signed in with. If you're using your TAPA Google Docs, you must sign in with your TAPA email account. (Students, that will be [your 4-digit Student ID]@tapa.tp.edu.tw.)


  3. Once you click done and Quickoffice gets a chance to communicate with your account, the account will show up on the far left of the screen. You can click on it to see its contents.


    If you've already added documents into your Dropbox (or Google Docs or SugarSync) account, you'll recognize those in Quickoffice. You may edit them on that program, and any changes you make and save will reflect across all other platforms immediately. If you've made any documents on the iPad, you can drag those easily into any of the other accounts below, and they will be copied into those cloud accounts.
Easy, huh?

Monday, August 29, 2011

Using Dropbox to wirelessly distribute files to iPads

Stanza
This summer, I taught 2 two-week semesters of American Literature class. Towards the end of the class, I decided to have my students read Pedro and Me, a biographical comic book written by Judd Winick about an AIDS activist in the '90s. I acquired* the CBZ (comic book) file, commanded my students to download Stanza, a free eBook and eComicBook reader, and went through the following process to get the 50 MB file to 16 students in less than 30 seconds.

  1. Use the Force... of the Public Folder. When you being using Dropbox, there will be a few folders automatically added. One, specifically, has a "magic" power—whatever file you put inside the Public folder will be given a public web address.


    For example, as you can see above, I've left the file Night (Full Text).pdf in my Dropbox folder.
  2. Access it on Dropbox.comFrom here, I can find go to Dropbox.com, log in, and scroll to where that file is located.


    When you scroll over the file, there will be a little down arrow on the far right. When you click on it, there will be an option for Copy public link. Click on that. A popup will show you the public address for your file—before you copy it to your clipboard, click Shorten Link, and then Copy to clipboard. Now you can distribute this link to anyone with a simple, short link. If only there was an easier way to distribute that link...
  3. QR, anyone? Go to QRstuff.com and paste in your link, and POOF!


    Now you have a QR that, if you scan, will download that PDF to the device (i.e. the iPad). The cool thing is that, since the file is on the internet, all the students can download the same file at the same time. 
There's tons of different applications for this: for example, I'm sharing a PDF, but this is also how I shared my syllabus with students and how I'm planning on giving out lots of teacher's resources that I'd usually just print out. Pretty cool trick, huh!?

*Don't ask.