Showing posts with label Blogsy. Show all posts

Friday, August 24, 2012

Talking maps? Yup, and on your blog, in 3 easy steps

It's no secret that I really enjoy using technology, especially in the classroom, and I like to find new ways to use new apps to do new things. British Literature students have an assignment to prove that they understand where the difference-makers of the first millennium (a.d.) came from, and to do that, they'll be using 3 apps to make a 60-90 second annotated video map. Here's how:
Maps (built-in)
  1. Screenshot your map. Using the Maps app, take a screenshot of the area you're going to be annotating. To do this, get the map in the correct position, and press the Home and Power buttons at the same time.


    By the way, make sure you set the map to the Satellite view. To do that, press the little page corner thing at the bottom right of the screen and select the correct view. I will not give points for doing this as the already-labeled Standard view, so change it!


  2. Edit the map with Skitch. There's a couple of nice drawing programs I've used since I had my iPad, but the two things I like about Skitch that sets it apart from the others is 1) you can send Skitches drawings to Evernote so easily, and 2) you can put an image* down as a "layer" beneath the drawing and easily write on top of it. Better yet, if you make a mistake or need to adjust something, you can easily clear everything except your original image off the program. Excellent.

    So about that map of Britain from the last step: When you screenshot it, it went into your iPad's Photo library. On Skitch, then, open that picture and add in the important "written" information for this assignment, like where the Celts or Vikings were from, or where Normandy is, or which part of Great Britain has London. Once you're finished, hit the little Send button (  )and then send it back to your photos.


    You should now have two copies of that map: the original blank one and the newly annotated one. Boom.

  3. ShowMe
    Annotate it with ShowMe.  Here's the fun part: with ShowMe, you can create "screencasts", or recordings of what you're drawing on the screen (and what you're saying outloud while you do it). I've shown how to use this program (and a similar, yet inferior, one called ScreenChomp before), and I've assigned students to show how Shakespearean sonnets "work" using ShowMe. Heck, I've even posted an excellent (albeit kimchi-scented) example using ShowMe.

    So, of course, we'll be doing it again for this assignment, with the twist being that you'll be screencasting your already-annotated Skitch-made screenshots, adding voiceover and movement. Download the ShowMe app, sign in (with is fine), and create a new project. On opening, you'll have a blank white canvas. Tapping on the little picture button at the top ( ) will allow you to select the background image you want ( yellow arrow ):


    When you're ready to start talking, press the little red circle (  ) at the top of the screen ( red arrow ), and ShowMe will record whatever you draw and whatever say out loud. Once you're finished you can simply hit the pause button, and ShowMe will upload it.

  4. BONUS STEP: EMBED INTO YOUR BLOG WITH BLOGSY. Say whaaaat? Yes, you can! My favorite little program will allow you easily embed your presentation into the post. Find your ShowMe presentation on their website (you'll probably have to log in again) and click the little Embed link icon (  ). This will give you the code necessary to post to your blog. I'd suggest you adjust the width of the size to 400px by 300px, but that's just me, someone who will be grading you (HINT HINT).


    Take this code to Blogsy and paste it into the HTML mode (which you get to by clicking the  button on the bottom right of the main page). Once you've pasted it, toggle back to the Formatting mode (by clicking the ), upload the post, and wallah!--Take a look at your work! With any luck, your blog should have your annotated video screenshot embedded into it!
So that's all! YES, it's a lot of steps, but truly, the hardest part should be learning the information you're going to explain, and you were going to do that, anyways! Best of luck to students in doing this process, and like always, email me if you have any issues in getting it uploaded.

*And, by extension, anything you can screenshot: photos, a web page, a map, a game, whatever.

Wednesday, August 15, 2012

Do you need Blogsy? Answer a quick survey to win a free* app!

Rather than handing in paper and killing trees [NOTE: the trees are already dead.], students will be doing the majority of their homework on a class blog. I have in-depth instructions on how to set one up, and I'm always available to tutor you through it as well, but simply setting up a blog is not enough.


A good blog includes pictures and video and interesting formatting, all with the purpose of earning (and keeping) your audience's attention. Typing up the information is really easy to do on your iPad--I mean, with a secret email address, you can even do it on Evernote or QuickOffice or the Mail app. However, if I'm going to give you TOAST points for including all the good elements of a blogpost, you're going to need to include some extra media.
This is where Blogsy, a favorite app of mine, comes into play. With this program, you can easily create a post that includes media, formatting, and clarity, all in a very easy-to-use package. Last semester, I wrote a primer on how to set up your blog with Blogsy, a must-read for TAPA students. We'll do some in-class training, too, for those of you struggling to figure it out. However, before any of that happens, we need to do something important: GET YOU THE APP.

You can just to to the App Store and buy it yourself, or I can purchase it for you and gift it to you in class. It's up to you, but you've got to let me know as soon as possible. This link (and the QR code to the left) will take you to a form you can fill out that will tell me if you need to buy it, if you want me to buy it for you, or if you already have it. This is a required app for Webb classes, and I will be giving you a quiz that includes the question:
DO YOU HAVE BLOGSY INSTALLED?
Those are fake smiles. They're actually angry.
If it's not, you're losing points, your grades will suffer, you'll probably not graduate from high school, and you'll have to spend the rest of your life giving pedicures to crocodiles. For free.

So, one more time:

TAKE THE QUICK 15-SECOND SURVEY TO LET ME KNOW HOW YOU ARE GETTING BLOGSY ONTO YOUR IPAD. RIGHT NOW.

Good.

*The app isn't really free, but I will freely buy it for you with your money. Sorry.

Wednesday, August 3, 2011

Configuring your blog for iPad use with Blogsy

Once you've set up your blog, the next step is to configure it for mobile use. There are two ways to do this: through a secret email address or through Blogsy, the blog publishing app endorsed by Mr. Webb. This manual will teach you how to use the latter method involving Blogsy.
  1. Get/Download/Open Blogsy. You'll most likely receive the gifted app in your TAPA email. Click on the icon.
  2. Add your TAPA Blogger account to Blogsy. Click on the light grey gear icon at the bottom right of the program to enter the settings, and then select Service Settings. From here, add a Blogger account (underneath Blog Platform) and sign in with your TAPA Google App account, using your full email address (i.e. stew-dent@tapa.tp.edu.tw) as your user name.
  3. Grant access to Blogsy. This is just you authorizing Blogsy to post on your behalf. 
  4. Log into other accounts. As you're exiting out of those settings, you'll go back to where you selected Blogger. There are options to tie in information from your Flickr, Picasa, and YouTube accounts into Blogsy. This is a great idea to add those in, especially Picasa and YouTube, which you can use with your TAPA Google App accounts, as well. 
  5. Try a test post. Exit out of those settings and go to your main app layout. It should look like this.

    The Black side of Blogsy is for writing plain text, while the White side is for adding media (pictures, videos, etc), so let's write up the text for this post right now.

    Now that that's done, I can flip the blog over (swipe the screen horizontally) and add in any media. You can add in images or video from Flickr, Picasa, or YouTube, or, like I did here, just from Google Images.

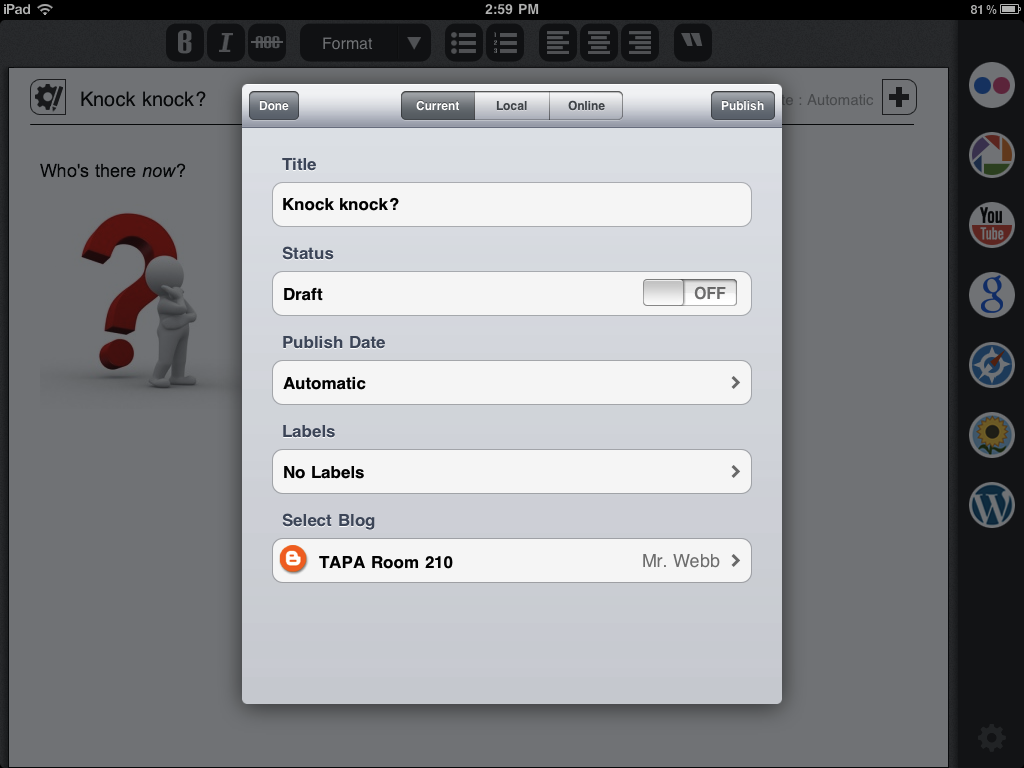
    Finally, when you're ready to publish, you click the little gear icon at the top left (next to the post title) and publish it to the world!
  6. Enjoy. Bonus: Just in case something went wrong or you want to update a post, just click on that little gear at the top left, hit the header that says Online, and open up and edit any post you want to. Just make sure before you exit the program to again publish the changes to the page.