Showing posts with label Tech Support. Show all posts

Wednesday, February 13, 2013

"You still haven't set up a blog?" A How-To Guide to Blogger

You'll need more than good fortune to pass if you haven't set up a blog yet.

"What do you mean 'a real computer'?
Are you implying this can't do everything?"
I'm pretty shocked that, this late into the school year, there are still students who have yet to set up a Blogger blog for displaying their public classwork. If you have yet to do that yet (or you're just curious about how to do it), here's my How-To.

WARNING: you can do this process on your iPads, although I find it much easier to do on a real computer. However, when it comes to actually making blog posts, I'd strongly suggest that you use Blogsy, the app that I'm very willing to buy you with your money if you just let me know. For step-by-step instructions on how to set up Blogsy, check out this post.

  1. Log in to Blogger.com. You may use your TAPA email information or your own Google login.

  2. If the next page asks you if you want to connect to Google Plus, tell it no. I don't have a screenshot, but skip it. You don't want that setting on.
  3. When you see this page, click on "New blog" to make a new blog. Duh.

  4. Put in your new blog settings. Use the following as a basis:
    • For the title, you can use something simple like "Bobby's British Blog" or "Alex's American Lit Arena" or "Erin's English II Place" or something like that.
    • For the address, I prefer your first name and ID number (e.g. Chris9989.blogspot.com).
    • For the template, I don't care. Pick whichever one you want, and later, you can change it to something cooler.
    When you're done, click  Create Blog! .

    WARNING: For your own safety, please don't use your first and last name anywhere on here. You can use Firstname and LastnameInitial (e.g. ChrisW, not Chris Webb). There are lots of creepy people online, and while they can find you if they want to bad enough, let's not make it easy on them.
  5. Now that you're blog is completed, do a sample post. Again, this is way easier to do with Blogsy, but for this first time, the website is fine.

  6. Make your first post. Be sure to include a title, the body text, and images so you get full TOAST points. And when you're done, don't forget to publish it.
  7. Check your work. Once you've published it, you'll get to this screen.

    Click on  View Blog  to see your final page.
Ok? Ok! Make sure your blogs are set up and ready to go!

Monday, September 10, 2012

Digital flashcards on-the-go! Now there's no excuse to skip studying!

An old-school
learning tool
Growing up, I remember using flashcards to help me memorize things for school: equations, state capitols, definitions, any. Using notecards is a little bit outdated now, but with a cool app I've been playing around with recently, it's again available, but now on the iPad!

Click to download.
On the app store, it seems to go by the name Flashcards*, but on downloading, you'll see Flashcardlet; either way, you'll want to get the app to the right. On installing it, there will only be one or two flashcard stacks set up. I'd try flicking through to see how it works. Simply, though,
  • One tap will show the other side.
  • Sliding the card across will proceed to the next slide.
  • Double tapping will return to the last slide.
The app works in both landscape and portait modes, and, as an added feature, this is a app, meaning that it will work for both iPad, iPod Touch, and iPhone, so there's more bang for the buck.
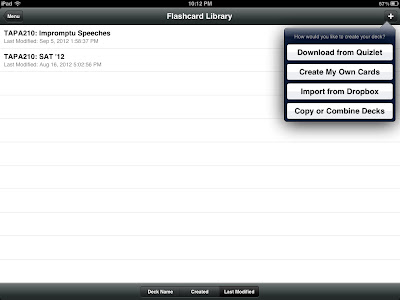
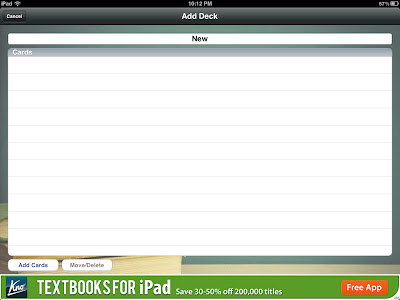
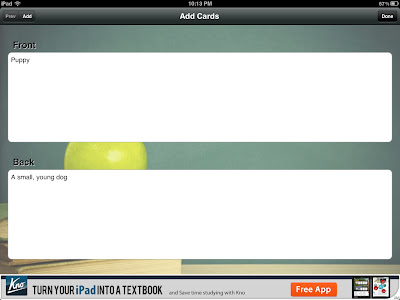
So, then, the logical next question is how to make your own cards. It is possible to make them on the iPad, although it is an admittedly clumsy process. Here's how, though:
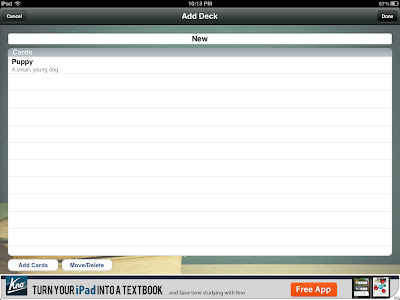
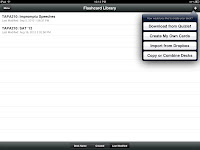
  1. On the top right, click Create My Own Cards to make your own set. (This will be after clicking on Flashcards on the main screen, by the way.)

  2. Title your deck in some way you'll remember it.


    Then click Add Cards.
  3. Fill out card fully. Click Done when you're done. (Duh.)

  4. Repeat the Add Cards step over and over until you have everything the way you want it. On completion, you may hit Done again.

That's basically it. Now, from here you can Share the stack with others via email or by Dropbox, which is very convenient for study buddies or classes.

It's a simple process, but time-consuming. A superior option would be using Quizlet, a free website that makes flashcards online. Flashcard* will actually all you to import any flashcards you make on Quizlet, and it's MUCH faster to do online with a real computer.

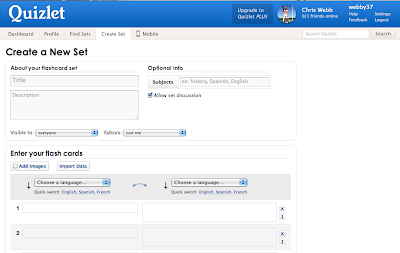
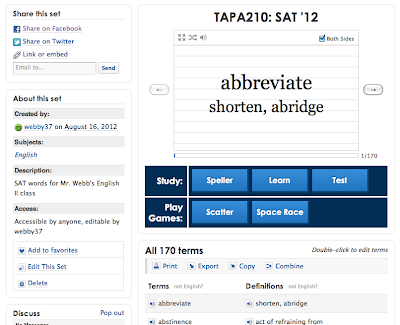
To make this happen, you simply go to Quizlet.com, create an account, and then click Create Set. As you can see, Quizlet allows you to easily make your own cards with whatever text (or images, apparently) you want. It will even auto-define words for you, in whatever language you please!

A new set, ready to be personalized.
My favorite feature, though, is under Import Data; you can simply paste in a list of vocabulary words, separated from their definition by a tab, a semicolon, or whatever symbol you already use. I have a list of SAT words my English II students memorize that I copy-and-pasted into this section; within 15 seconds, I had 170 vocabulary notecards, ready to go. I put a title on it my students (and myself) can easily find, and now, every student has 170 flashcards so they can review for their next test, any time or any place!
Click here for my SAT words!
It's such a simple process, and one you can easily pass on to your students. Give these two cool tools a try, and let me know how they go!


Friday, August 24, 2012

Talking maps? Yup, and on your blog, in 3 easy steps

It's no secret that I really enjoy using technology, especially in the classroom, and I like to find new ways to use new apps to do new things. British Literature students have an assignment to prove that they understand where the difference-makers of the first millennium (a.d.) came from, and to do that, they'll be using 3 apps to make a 60-90 second annotated video map. Here's how:
Maps (built-in)
  1. Screenshot your map. Using the Maps app, take a screenshot of the area you're going to be annotating. To do this, get the map in the correct position, and press the Home and Power buttons at the same time.


    By the way, make sure you set the map to the Satellite view. To do that, press the little page corner thing at the bottom right of the screen and select the correct view. I will not give points for doing this as the already-labeled Standard view, so change it!


  2. Edit the map with Skitch. There's a couple of nice drawing programs I've used since I had my iPad, but the two things I like about Skitch that sets it apart from the others is 1) you can send Skitches drawings to Evernote so easily, and 2) you can put an image* down as a "layer" beneath the drawing and easily write on top of it. Better yet, if you make a mistake or need to adjust something, you can easily clear everything except your original image off the program. Excellent.

    So about that map of Britain from the last step: When you screenshot it, it went into your iPad's Photo library. On Skitch, then, open that picture and add in the important "written" information for this assignment, like where the Celts or Vikings were from, or where Normandy is, or which part of Great Britain has London. Once you're finished, hit the little Send button (  )and then send it back to your photos.


    You should now have two copies of that map: the original blank one and the newly annotated one. Boom.

  3. ShowMe
    Annotate it with ShowMe.  Here's the fun part: with ShowMe, you can create "screencasts", or recordings of what you're drawing on the screen (and what you're saying outloud while you do it). I've shown how to use this program (and a similar, yet inferior, one called ScreenChomp before), and I've assigned students to show how Shakespearean sonnets "work" using ShowMe. Heck, I've even posted an excellent (albeit kimchi-scented) example using ShowMe.

    So, of course, we'll be doing it again for this assignment, with the twist being that you'll be screencasting your already-annotated Skitch-made screenshots, adding voiceover and movement. Download the ShowMe app, sign in (with is fine), and create a new project. On opening, you'll have a blank white canvas. Tapping on the little picture button at the top ( ) will allow you to select the background image you want ( yellow arrow ):


    When you're ready to start talking, press the little red circle (  ) at the top of the screen ( red arrow ), and ShowMe will record whatever you draw and whatever say out loud. Once you're finished you can simply hit the pause button, and ShowMe will upload it.

  4. BONUS STEP: EMBED INTO YOUR BLOG WITH BLOGSY. Say whaaaat? Yes, you can! My favorite little program will allow you easily embed your presentation into the post. Find your ShowMe presentation on their website (you'll probably have to log in again) and click the little Embed link icon (  ). This will give you the code necessary to post to your blog. I'd suggest you adjust the width of the size to 400px by 300px, but that's just me, someone who will be grading you (HINT HINT).


    Take this code to Blogsy and paste it into the HTML mode (which you get to by clicking the  button on the bottom right of the main page). Once you've pasted it, toggle back to the Formatting mode (by clicking the ), upload the post, and wallah!--Take a look at your work! With any luck, your blog should have your annotated video screenshot embedded into it!
So that's all! YES, it's a lot of steps, but truly, the hardest part should be learning the information you're going to explain, and you were going to do that, anyways! Best of luck to students in doing this process, and like always, email me if you have any issues in getting it uploaded.

*And, by extension, anything you can screenshot: photos, a web page, a map, a game, whatever.

Monday, August 13, 2012

Setting up your TAPA email account

Originally posted 8/3/11.

SO, full disclosure: I actually made this blogpost last year, before we figured out the settings were wrong. I just got it corrected, moments ago, so if you've had problems using it, try the new directions (  highlighted in yellow  ).


Part of the new technology program at Taipei Adventist Preparatory Academy includes TAPA email, calendar, documents, and Blogger access, provided by Google through its Apps program. Every student will have an account to which much school communication will be delivered. Setting up your account is very easy to do:
  1. Log into your TAPA Google Apps account (via a computer). Log into your TAPA email at mail.google.com. Your account name is the  last 4 digits of your ID, like 0000@tapa.tp.edu.tw , and your password is the last 4 digits your Student ID, followed by the "@" sign, followed by your family name (all lower case). So, for example, Stew Dent (ID #123456) would be 3456@tapa.tp.edu.tw, and his password would be 3456@dent.
  2. Change your password to something you will remember. You will always log into your Google Apps account with your full email address as the username (e.g. 3456@tapa.tp.edu.tw). Your password will be whatever you change it to, so please remember it.
  3. Add your Google Apps account into your iPad. Under Settings on your iPad, click on the Mail, Contacts, Calendar tab on the left side. Click Add Account, then GMail, fill in the following settings, and click next:
  4. TAPA Mail should now be configured to your device. Additionally, your TAPA calendar is also now configured, so any event you add onto your iPad will be automatically be synced to the internet (and vice versa).

Sunday, August 12, 2012

Setting up your blog

Originally posted 8/3/11.
The infamous Trapper Keeper...
where paper went to die.
When I was growing up, the fun part of beginning the school year was the back-to-school shopping day. My mom would take me to Wal-Mart, and we'd go up and down the aisles, buying me pens and Trapper Keepers (do you know what these are?) and folders and all the other stuff I needed to be a successful student. Even though we were just shopping, it was the amazing time of newness, and, I think in my head, it symbolized new opportunities and experiences I was going to get.

For TAPA students, back-to-school shopping my have lost its zeal with iPads being the new tool du jour, but we still need to get some new tools to make this semester more productive. For students in my classes, instead of simply turning in assignments to me (which I will inevitably not grade for a while, and once I do grade, will be buried in a file folder until I eventually realize that I need to turn them back to you), each class member is responsible for a blog which they will post to multiple times a week. Being that this is your blog, and not just a place to put Webb's assignments, I'd hope and expect that you'll do writing above and beyond the requirements for class—make this school project more than just a school project! Here's how to do it:
  1. Go to Blogger.com and sign in with your TAPA account. The username should be your TAPA email address (e.g. stew-dent@tapa.tp.edu.tw) and your password should be whatever you changed it to earlier.
  2. Complete the blog registration, using your TAPA email address. Also, accept the terms of service.
  3. From here, click on the top right of the middle section of the page, where it says Create a Blog.

  4. Complete the blog creation registration. Also, select a theme for your blog (not pictured; you can later change the theme to further personalize to your liking.)

  5. On completion, Blogger will ask you to start blogging. Click to follow and create an initial blog post. You may either save it as a draft (not published), or you may publish the post to the entire world!
  6. From here, continue on to the two options of how to easily publish from your iPad: through a secret email address or through Blogsy.

Friday, August 10, 2012

Required Apps for Webb classes

Originally posted 8/4/11.

For our second year, Taipei Adventist Preparatory Academy is going "full-iPad"—thin, electronic tablets instead of heavy paper books. Being that now students will have computing power at their fingertips, they won't simply be expected to use their iPads as textbooks—they'll also be expected to use them for enhancing their learning other ways, as well. There is a set list of apps that are required school-wide, but there's also a special list of (mostly) free apps that will be expected to be used in Mr. Webb's classes:


GoodReader
The "bread-and-butter" app of TAPA, this will be the program that you use the most. You'll use GoodReader to access your textbooks (scanned in as PDFs), but it's more than just a viewing app. You can write notes, highlight text, draw shapes, search text (and notes, and highlights, and anything shape you put in), and, strangely enough, even watch videos that won't play natively on the built-in Movies app. 

QuickOffice Pro HD
Basically, this is Microsoft Word, PowerPoint, and Excel, but designed specifically for the iPad. The PowerPoint feature is especially pretty cool, as it allows you to create and display your presentation easily, through the use of the iPad-to-VGA (Projector) adapter AirServer, onto the Mac Minis in every classroom. This has Dropbox and Google Docs integration, too, so sign in to get the most out of it.

Evernote
Where do you start? Note-taking abilities? Check; does it better than Notepad, and includes rich text and the ability to add in pictures. Recording audio? Hit the little  icon and easily record your teacher's talk. Remembering what the whiteboard said? Take a photo of the board and put it in, and, later, you can search the picture for text. Add in tagging (the best feature you're not using), and, most importantly, everything backed up to the internet, and you've got a killer app you should be using every period.

Blogsy (Soon...)
Most students know about my ginormous crush on Blogsy. I only love it because 1) it's everything I've ever wanted for a mobile blogging app, and 2) it's awesome developer personally has listened to me about a few new features. With all the blogging you're going to be doing in my classes, you'd be silly to not purchase this as soon as possible. ***UPDATE*** Now required! And I'll even buy it for you!

Dropbox
I've written the long version before, but, in short, Dropbox is a virtual, internet-based flash drive that updates documents instantly anywhere you have it installed. Install it onto your home computer and your iPad, and log into each account; then, write an essay on your home computer, and it'll show up on your iPad. Edit on the iPad, and it's fixed at home. Best of all, it'll protect you from losing everything if your break your iPad. Required for success.

Scan
There's a hundred QR readers on iTunes, and you technically can get any one you want, but Scan is my personal favorite. It's as simple of a program as you can get: just point the camera at any QR code and boom—Information instantly. At the very least, pick up this free app.

Easy QR
"BUT MISTAH WEBBAH, WHY WE NEEDAH TWO QR APPSAH?" First off, speak better English. Secondly, occasionally, one of the QR readers won't work as well as the other, so it's smart to have 2. But, most importantly, Easy QR allows you to easily make your own QR codes to distribute any number of ways. Smart to have.

Minu Timer
For the most part, the only app that we'll use for Communications class will be the YouTube app, which you will use for uploading your practice speeches. However, if there's another I'd really love to have every student to have, it would be this timer app. Very simple and elegant, Minu Timer is my preferred choice, and what I'll most likely use in timing your speeches during class.

iBooks
Soon, in my classes, I'll be releasing a textbook that will contain nearly all of the reading material we'll be using in all my classes throughout the year. Until iTunes approves it, we'll be on standby, but it's not a stupid idea to download this to be ready for when I amaze you. 

Stanza
While GoodReader is an awesome PDF reader, it lacks a pretty important function: reading other types of files, such as ePub (for eBooks) and CBZs/CBRs (for digital comic books). Whatever GoodReader cannot read, Stanza can and will. Its PDF reader isn't amazing, but the other features it can do will more than make up for it. iBooks will also work, but Stanza is infinitely better.

Shakespeare (Free)
An absolute necessity for anyone planning on taking first semester of British Literature, we will read at least 3 plays off this app. The free version is all that's necessary, although the paid app does have a built-in glossary for those tough-to-understand Shakespearean words.

Free Books
It's pretty amazing to me that this app designer has been able to get over 23,000 books into his app, all legally, and all for free, but it's true. For my classes, often times, if we're able to get the book for free, I'll just ask you to download them from this app rather than purchase you the book yourself. It'll save you time and money.